
How To Make A Website with WordPress – The Ultimate Guide
So, you’ve finally decided to build your own WordPress website and create a profitable blogging business online. That’s great news! But, do you know how to setup a WordPress website? Of course not. Why else would you be here, right?
Well, you’ve come to the right place. Once you’re done with this Ultimate Guide, you will have your own WordPress website up and running in less than an hour. Yes, it’s that simple!
We’ll take you step by step through the process. First, bookmark this page so that you can quickly come back to this guide if you accidently close the browser. Then sit back, relax, and start reading.
Note: For the purposes of demonstrations we chose specific domain name and web hosting providers because we believe they offer the highest quality services at affordable rates and beginner-friendly experiences. This doesn’t mean you have to choose the same service providers to complete this guide. If you prefer a different service, feel free to use them instead.
Who Is This Guide For?

This is a website setup guide for everyone from complete beginners to advanced internet users. You don’t need any experience in web design, WordPress or programming to follow this guide.
There are plenty of “how-to” guides out there that tries to teach people how to create a website, but most of those guides either contain too much technical information or just not enough details for a beginner to understand.
Which is why we decided to create this beginner friendly Ultimate Guide with much more detailed step-by-step instructions for setting up your own website.
5 Steps To Setting Up A Website

Even though some people (especially web developers) make it sound like a job for the experts, setting up a website of your own is not that difficult. Anyone with some basic knowledge of the internet could easily pull it off.
It’s actually a simple 5-step process:
- Choose A CMS (Content Management System).
- Find A Domain name.
- Choose a web hosting plan.
- Get a theme for your website.
- Setup the website.
We’ll talk about each step of this process in more detail. Let’s get started, shall we?
#1 What Is A CMS?
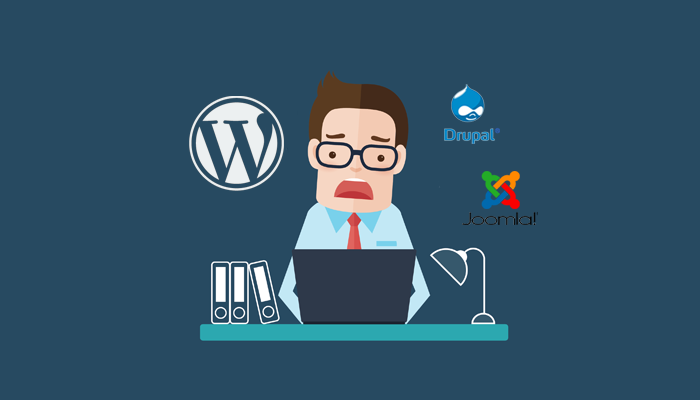
Before we get to the fun part of this guide, it’s important that you get a basic understanding of what WordPress really is and what kind of a software it is.
WordPress is a Content Management System (CMS) and it’s the most popular CMS available today. A CMS is a software that you can use to easily manage your website’s content, such as images, videos, and articles from an easy-to-use dashboard.
While WordPress is the most preferred CMS on the internet, there are several other software that are also suitable for building websites, such as Drupal and Joomla.
However, those CMS software come with a bit more complicated features that are more suitable for advanced users. Which is why we always recommend WordPress to beginners.
Why Choose WordPress?
The ease of use is not the only reason why people love WordPress. It’s also a powerful piece of software that can be used to build almost any kind of a website, from a simple blog to an online shop or even a social network.
“WordPress is used by 27.4% of all websites on the Internet.” – W3Techs
Even some of the world’s biggest corporate businesses use WordPress to power up their official websites. Some of those big brands include Quartz, Target, Bloomberg, Forbes, Bata, and much more.
WordPress also has a massive community of users who are constantly creating themes, plugins, and add-ons to bring more features to the popular CMS.
Although, the most important reason why people choose WordPress is because it’s an open-source project. Which means, you can download WordPress and use it however you like to build as many websites as you want, for Free!
Automattic, the developer of WordPress, constantly rolls out updates for the platform to fix bugs and enhance the platform even further. Compare to other CMS software, WordPress is the best in our book.
Alright, now that we’re done with the boring stuff, let’s get to the fun part: Creating the website!
#2 Find The Perfect Domain Name
Searching for the perfect domain name is the toughest part of creating the website because simply put, all the good domain names are already long gone.
When choosing a domain name, it’s wise to get a domain name with a .com extension. It’s widely recognized as a reputable domain name extension that instantly gives your website a reputation boost. It’s also the most popular domain name extension, as a result finding a .com domain name isn’t easy. But, if you’re creative enough, it won’t be too hard to find a great domain name.
For example, if you can’t find a .com domain name for your business name, you can try adding an extra word. Like how the team behind Pocket did with their domain name. When setting up their website Pocket.com domain was already taken, so these guys used getPocket.com domain instead.
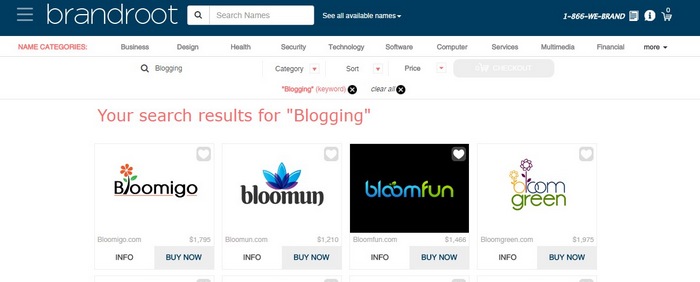
You can also use a business name generator tool, like Naminum or Brandroot, to come up with a unique name for your website. These tools also allow you to instantly check the availability of the domain names for each name you generate.
If you have no other choice, you can settle for a different domain extension, like .Net, .Biz, or .Blog. There are hundreds of top-level domains (TLDs) you can choose from.
Buying The Domain Name
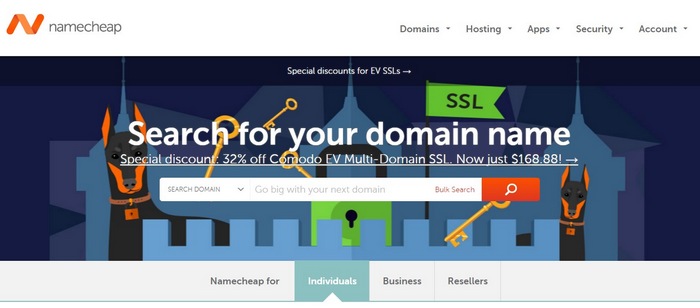
When you’re ready to buy a domain, you can go to a domain name registrar (we recommend NameCheap) and buy your domain.
Note: Almost all web hosting providers will offer you a free domain name when purchasing a hosting package. But, it’s important that you buy your domain name separately. This will give you more freedom and control over your domain name.
Here’s how you can purchase a domain name with NameCheap:
Step 1: Visit NameCheap.com website and search for your chosen domain name to see if it’s available.
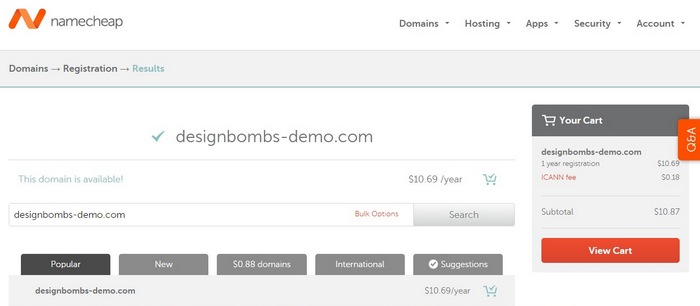
Step 2: If your domain name is available, add it to cart and proceed to the checkout.
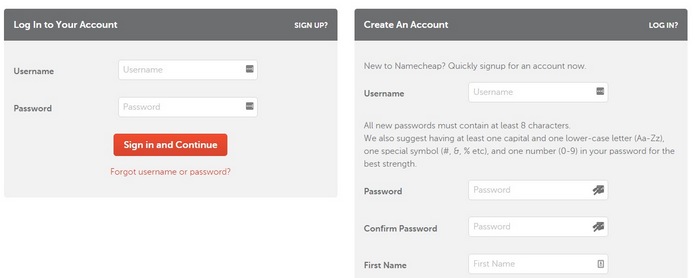
Step 3: Confirm your order and signup for a Namecheap account.
Step 4: Then continue the checkout process to purchase your domain.
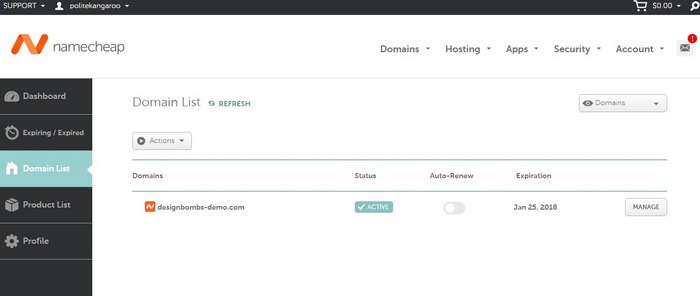
Step 5: After a successful checkout, you can access your NameCheap accountdashboard to manage your new domain name. Bookmark this link because we’ll come back here again later.
Now, let’s register with a web hosting provider.
#3 Choose A Great Web Host
In order to create your website, you need a place to host that website of yours. This is where web hosting providers come to aid. These service providers will give you space on their powerful servers to host your website and let people from around the world access your website.
Web hosting providers offer several different types of web hosting plans for creating different types of websites:
- Shared hosting.
- Managed WordPress hosting.
- Virtual Private Servers (VPS).
- Dedicated Hosting.
Managed hosting, VPS, and dedicated hosting plans will cost you a lot of money. For a beginner, we recommend choosing a shared hosting plan. That way, you won’t have to risk too much money and it gives you plenty of room to grow. When your website starts to receive thousands of visitors per day, then you can upgrade to a better plan.
Buying A Hosting Package
Siteground is one of our favorite web hosting providers, not just because of their fast and reliable service, but because of their incredibly responsive customer service.
Also, Siteground offers a special WordPress hosting plan for bloggers with a lot of useful features, like WordPress auto-updater, free SSL, free daily backups, and more. Plus, they also have a 3-level WordPress SuperCacher option (available with GrowBig and GoGeek plans) for giving your website a speed boost. Which is exactly why we chose Siteground for this demonstration.
Now, let’s get you a web hosting package.
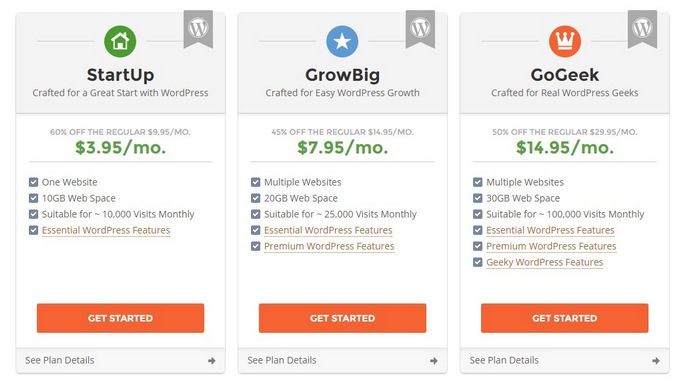
Step 1: Visit Siteground website choose a package. For a fresh WordPress website, the StartUp package is more than enough. And if you needed to, you can upgrade to a better package at any time.
Step 2: Select your package and click Get Started.

Step 3: On the next page, choose “I already have a domain” and enter the domain name you already purchased from Namecheap.
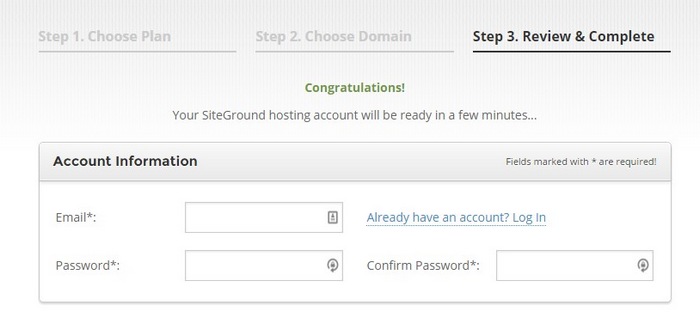
Step 4: Enter your details to create a new Siteground account.
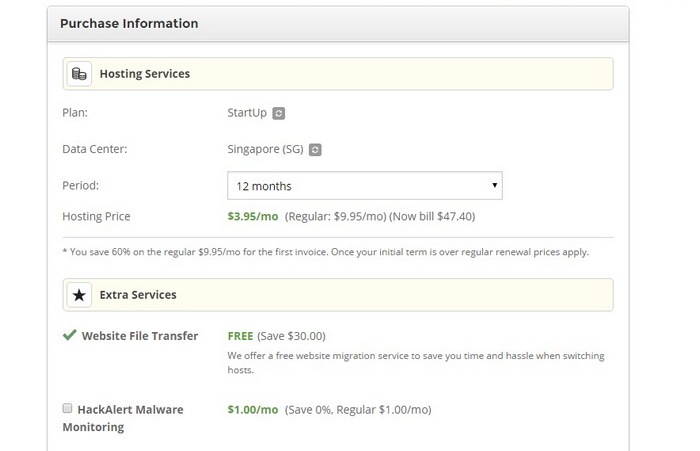
Step 5: At the bottom of the page, you can select how many months you’d like purchase hosting for your website.
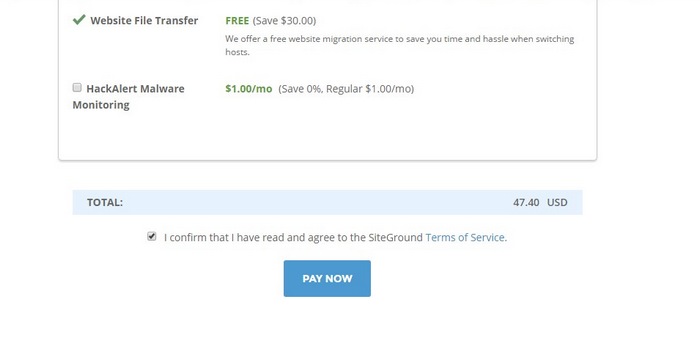
Step 6: When you’re ready, agree to the terms and conditions and click Pay Now to confirm the order.
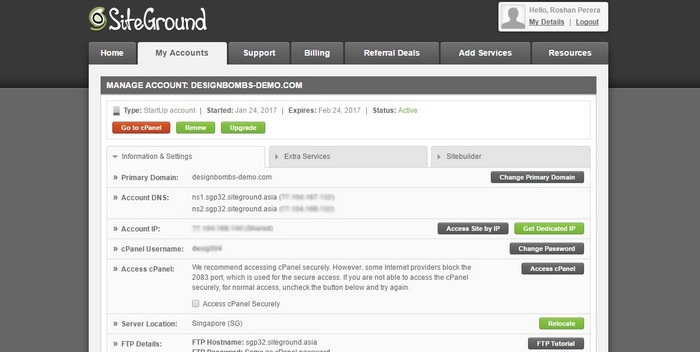
Step 7: And proceed to the Customer Area. Switch over to the My Accounts tab and there you will see all the details of your account. Remember this page, we’ll come back here again later.
Configuring Domain Name
Now that you have a hosting package, you need to configure your domain name through your NameCheap account to point it towards Siteground servers for your website to be fully functional.
To do this, you need to enter Siteground nameservers for your domain name. Here’s how you do it:
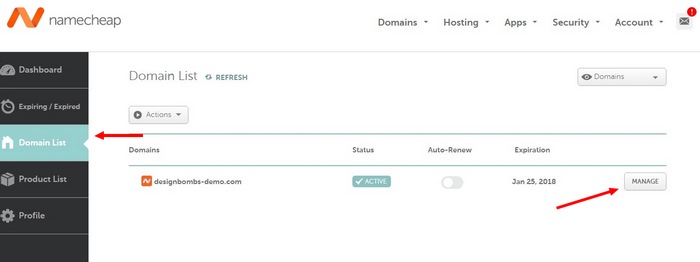
Step 1: Visit your NameCheap account page and then go to the Domains List and click on the Manage button next to your domain name.
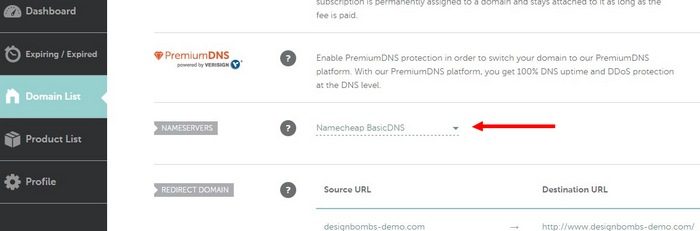
Step 2: Scroll down and find the Nameservers section and select Custom DNS.
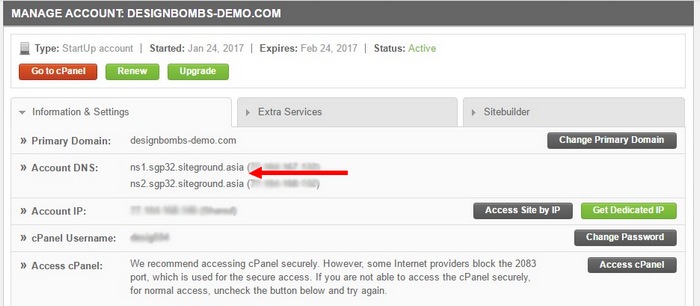
Step 3: Go back to your Siteground My Accounts page and copy the nameserver addresses over to the Namecheap page. It should look like this ns1.sgp00.siteground.asia. Do not copy the addresses inside the brackets.
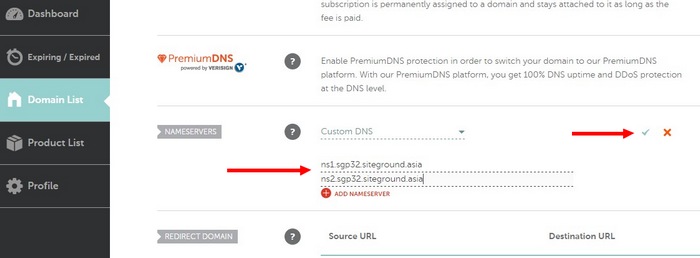
Step 4: Then click the Save button to save the changes.
It could take several minutes or sometimes even several hours for the changes to take effect. So, be patient.
Installing WordPress
Once your domain is successfully connected to your web hosting account, you can go ahead and install WordPress on your hosting account. You can do this in a few simple steps.
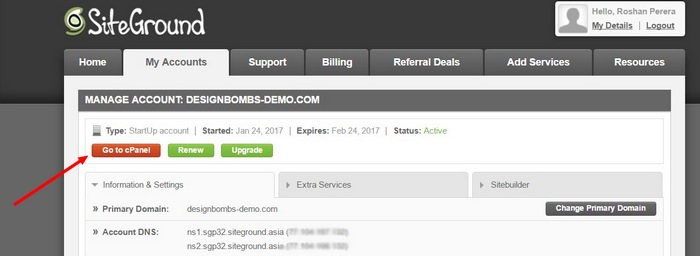
Step 1: Go to your Siteground My Accounts page and click the Go To CPanel button to go to the CPanel.
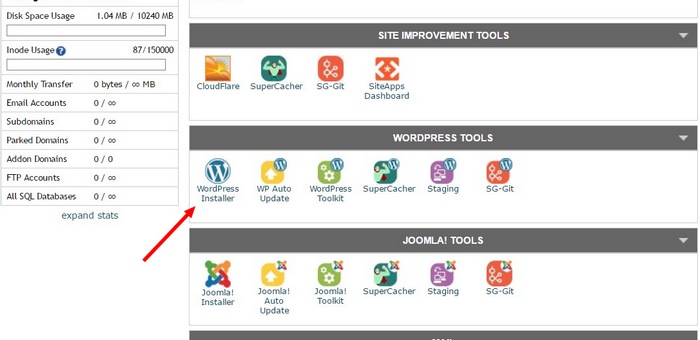
Step 2: Scroll down and find the WordPress Installer and click on it.
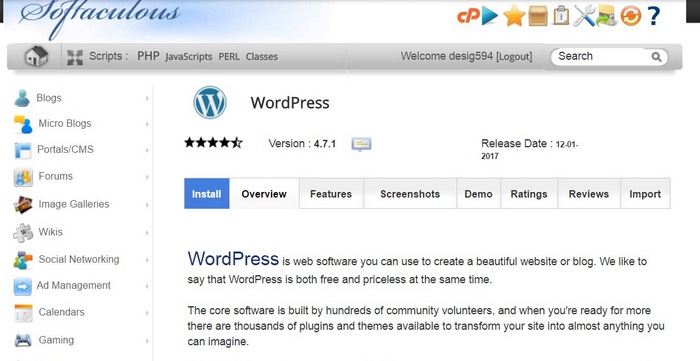
Step 3: Now click Install and choose the settings you want for your WordPress website.
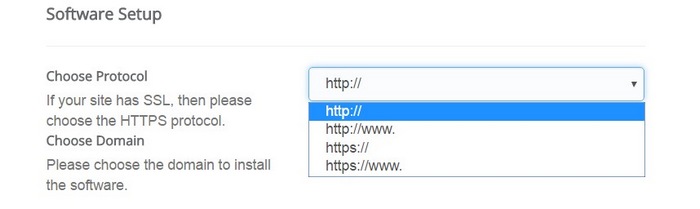
Step 4: Select whether you want your website to appear with www. extension or if you want to install your WordPress website into a directory like yourdomain.com/blog. Or leave these settings at default if you’re not sure what to pick.
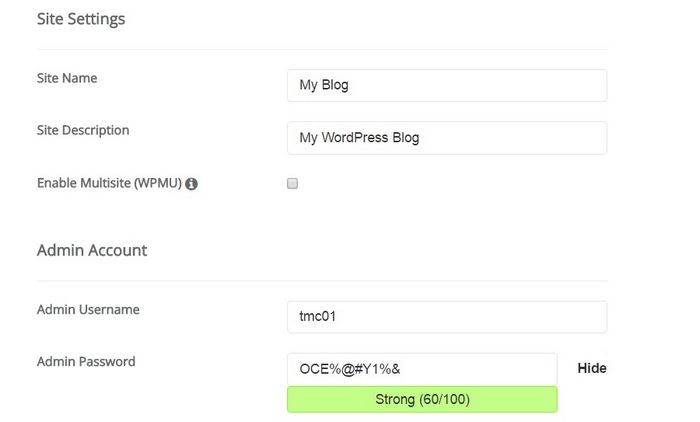
Step 5: Enter details for your WordPress website, including your website name, a description. These can also be changed later.
Step 6: Also, choose an Admin username and a password for your WordPress website account. Remember to choose a strong password and write down the username and password details you enter here. You’ll need it to access your website later.
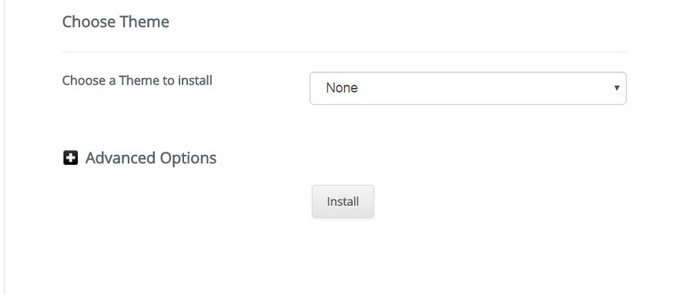
Step 7: Click Install and wait for the installation to finish.
You’re all set! Now you should see your brand new WordPress website. And you can access your WordPress administrator dashboard by going to yourdomain.com/wp-admin and entering your username and password.
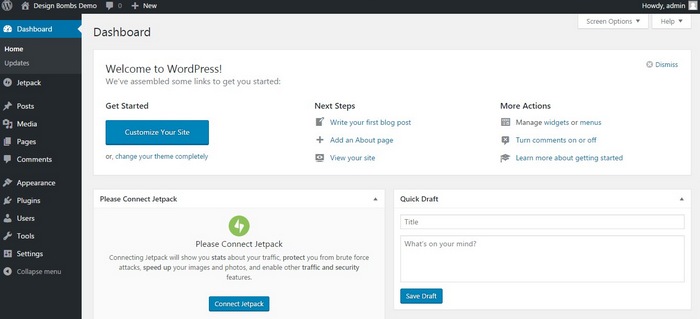
Your WordPress dashboard will look like this.
#4 Get A Theme For Your Website
Your website is almost ready, the only problem is that the design of your website doesn’t look very professional. That’s because your WordPress website is currently using the default WordPress theme. But, don’t worry you can easily change this theme to a better-looking theme.
There are thousands of free themes available on WordPress directory which you can download and use for free. However, most of those themes have ugly designs and are used by thousands of other blogs all over the web.
To make your website look more professional, it’s important that you use a premium WordPress theme for your website.
Where To Find The Best WordPress Themes
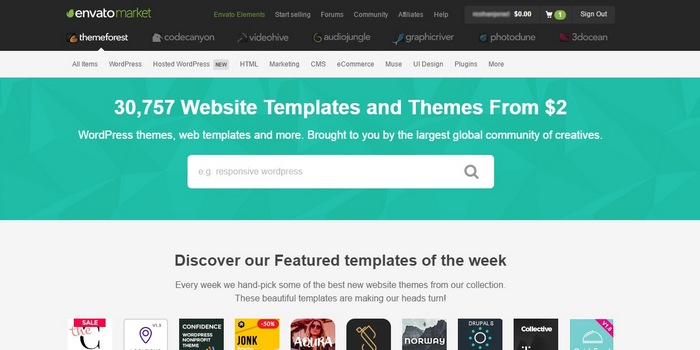
Premium WordPress themes can cost somewhere between $19 to $59, depending on where you buy them. The best place to find beautiful WordPress themes at affordable prices is ThemeForest.
ThemeForest marketplace has over 8,500 themes designed and coded by professional web developers. These themes will not only make your website look more professional, but it will also help your website to rank higher on Google because the themes have already been optimized for search engines.
There are different themes for different types of websites. Choose wisely and buy a theme that fits your industry and the topic of your website. If you’re not sure about which theme is best for your website, check out our WordPress theme rounduparticles to get some inspiration.
#5 Setup Your WordPress Website
It’s time to go hands-on and start setting up your WordPress website. There are a few things you need to do before start creating new articles and uploading any content to your website.
Let’s start by customizing the basic settings of the website.
Configuring The Basic Settings
Step 1: Access your WordPress dashboard by going over to yourdomain.com/wp-admin and entering your username and password.

Step 2: Go to the Settings section and customize your website by choosing your own timezone, date format, or even changing the name of your website. (Do not change the URLs on this page)
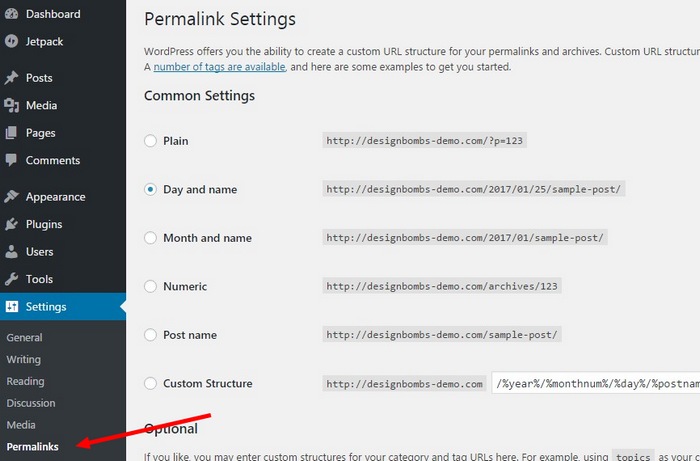
Step 3: Go to Permalinks to change how you want your website’s URLs to appear. Choose whether you want them to appear with the date, month, or just the page name.
Step 4: Hit Save Changes to save the settings.
Installing Your Website Theme
Installing free themes for your WordPress website is easy. You just have to go to Appearance > Themes, find a theme, and click Install. But, when you buy a premium theme, you have to manually install it by yourself.
After downloading a premium theme, you will receive a .ZIP file containing the theme file and a documentation for the theme with instructions on how to customize your theme. Take your time and read those instructions before moving forward to learn how to properly customize your new theme.
Then you can install your theme through the WordPress dashboard. For this demonstration, we’ll be using the free blogging theme, Karen.
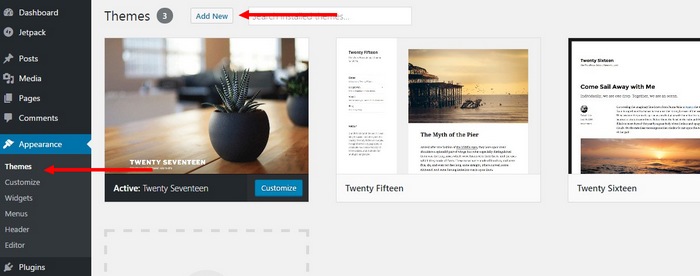
Step 1: Got to Themes page on your WordPress dashboard and select Add New. Then choose to Upload Theme.
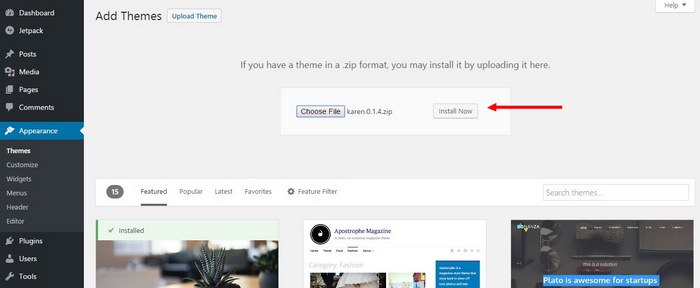
Step 2: Browse your computer and find your .ZIP theme file. And click Install Now.
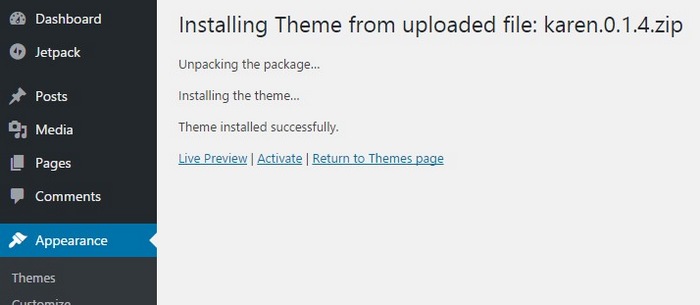
Step 3: When the installation is complete, click Activate to activate the theme you’ve just installed.
Now you’ll see your new theme appearing on your website. Now, you need to customize the theme to match your branding.
Customizing The Theme
Different themes have different ways of customizing the design. Premium themes have its own Editor pages where you can easily change the settings and the design of the theme.
Most free themes don’t allow you to make such advanced customizations. But, you can still change the appearance of your theme.
Step 1: Go to Appearance and choose Customize from your WordPress dashboard.
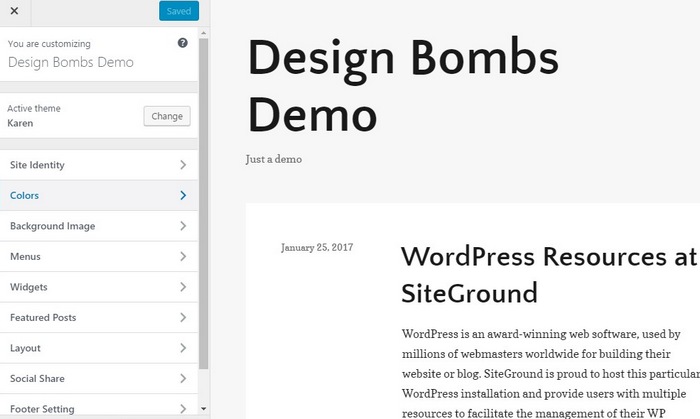
Step 2: From there you can change the colors, add background images, change the layout, and personalize your theme however you like.
Setting Up The Menu
Now, you need a menu for your website where people can easily explore your website. Let’s create one.
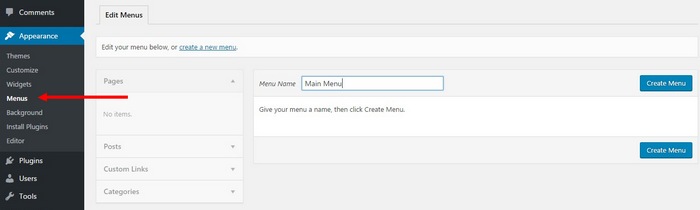
Step 1: Head over to Appearance > Menu and create a New Menu.
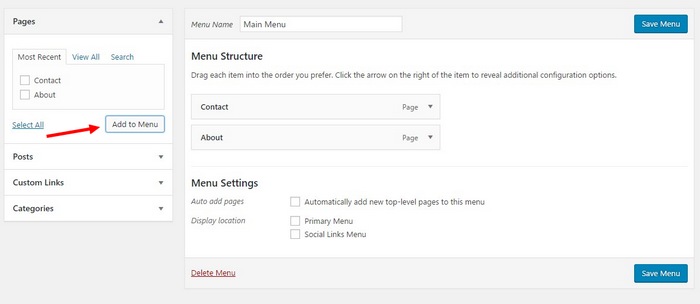
Step 2: Then you can add your Pages, Categories, and Links to your menu.
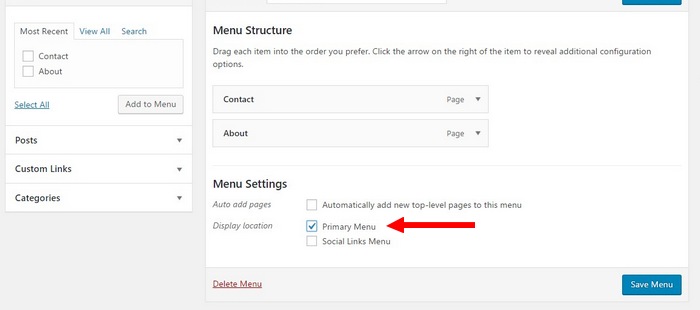
Step 3: Add all your items and choose where you want your Menu to appear on your theme.
Step 4: And Save your changes.
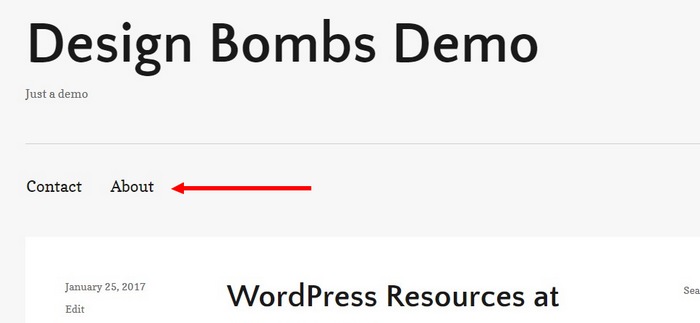
You should see your new menu appear on your website now.
Installing Plugins
Installing plugins is a great way to add more features to your website. There are thousands of plugins on WordPress directory you can choose from to customize your website.
Here’s how you can install them.
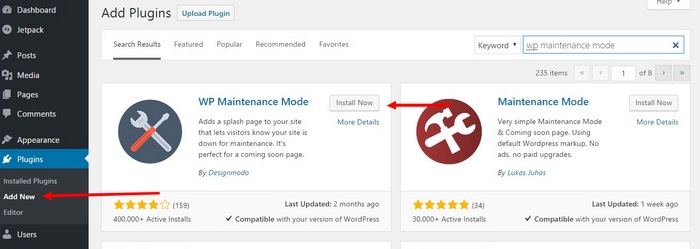
Step 1: Go to Plugins and choose Add New Plugin.
Step 2: Search for the plugin you want to install and click Install.
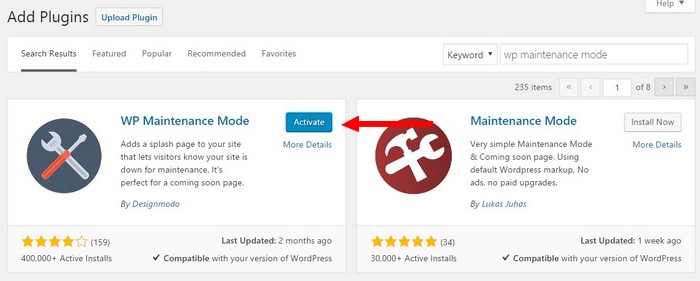
Step 3: Now click Activate to activate the plugin.
Step 4: That’s it!
Be sure to read our WordPress plugin reviews to find the best plugins for your website.
Customizing Your Website Sidebar
The sidebar of your website is one of the key areas that allows you to show important content to your visitors, such as advertisements, social sharing buttons, email opt-in forms, etc.
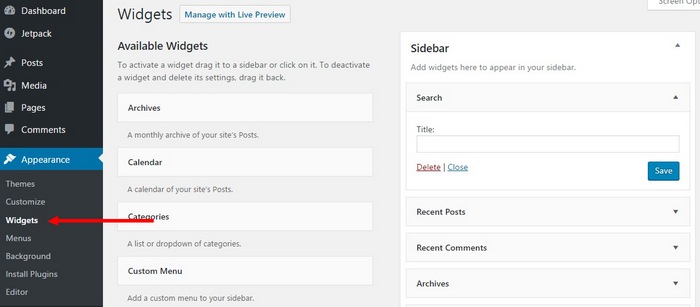
To customize the sidebar, you need to go over to Appearance > Widgets. From there you can add new widgets to your sidebar or even delete unnecessary widgets.
Creating New Categories, Pages, and Posts
You can now start creating new pages and posts on your WordPress website. But, before that, you should create a set of categories to organize your posts and pages.
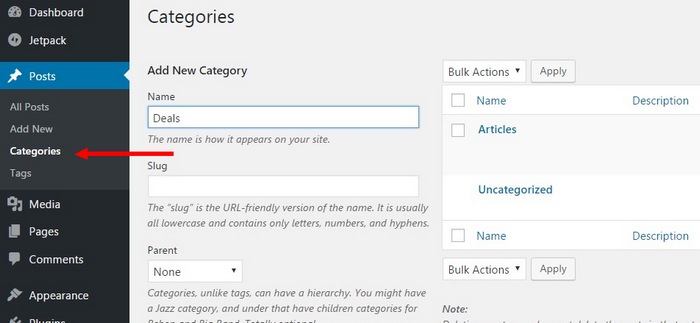
To create a category, head over to Posts > Categories. Just enter a name for your category and click Create Category button. You can also add these categories to your menus as well.
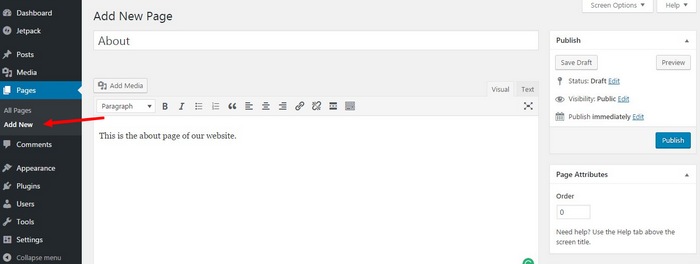
To create a new page, go to Pages > Add New to create a page. Enter a name for the page along with the content and click Publish button to publish the page when ready.
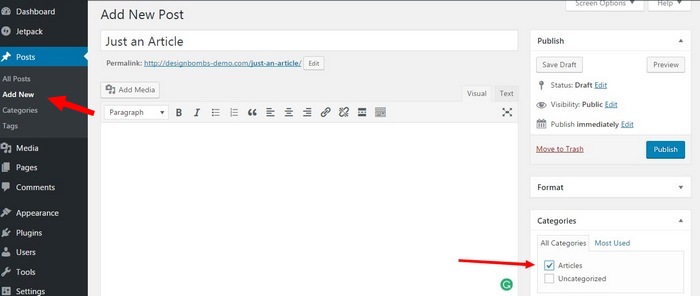
To create a new post, go to Posts > Add New. Enter a name and content. Before publishing, choose a Category to publish your post under to organize your articles.
And that concludes our guide.
Over To You
Congratulations! You are now a proud owner of a WordPress website.
Now, it’s time for you to take control and start developing your website. Whether you plan on using the site to blog about the things you love, setup an online shop, or just creating a website for a friend, there is a lot more work to be done before launching your website.
So, what are you waiting for? Get to work and turn that website into a piece of art! And don’t forget to leave a comment and tell us what it was like to build a website for the first time.
 ne.
ne.


 Note: Domain privacy shows up only if you get domain from BlueHost. If you already bought a custom domain, you should enable domain privacy (SiteLock) setting through your domain registrar.


6.png)

